
How to Build a Combined and Deduped ABM Lead List Using Apollo, Clay, Instantly, GraphIQ, and ListKit
Learn how to build one clean, deduped ABM lead list by combining contacts from Apollo, Clay, Instantly, GraphIQ, and ListKit. This guide walks through account prep, contact sourcing, field cleanup, deduplication, enrichment, and activation for outbound campaigns and matched audience ads.

Most B2B SaaS teams think list building means exporting a CSV from Apollo and calling it done.
That’s not really how ABM works.
If you’re trying to build a serious account-based marketing motion, the list is not just a spreadsheet. It’s the audience layer for your outbound emails, LinkedIn follow-up, matched audience ads, retargeting, enrichment, SDR workflows, and eventually your whole demand generation engine.
As Ryan put it in the playbook, “The goal is to assemble one clean, de-duplicated master contact list, enrich it heavily, and push it into ad audiences or outreach.”
That sentence is the whole strategy.
You’re not trying to get one export from one source. You’re trying to build the cleanest, most complete version of your total market by pulling from multiple tools, combining the data intelligently, removing duplicates, filling the gaps, and then using the same audience everywhere.
In the build this process came from, the team used Apollo, Clay, Instantly, GraphIQ, and ListKit. Each tool had a slightly different role. Apollo brought volume. Clay handled account enrichment, people sourcing, and waterfall enrichment. Instantly provided SuperSearch and enrichment through Copilot. ListKit added triple-verified contacts. GraphIQ was tested as a secondary source, especially for firmographics and relationship-style data, although it was not the strongest source for clean job-title-based contact pulls in that specific workflow.
The key is that every platform starts with the same confirmed account list. That means the same company domains, the same target accounts, the same vertical segmentation, and the same target personas. Otherwise, you end up with five different lists that look similar but don’t actually map cleanly to the same market.
Start with the account list, not the contact list
The first mistake people make is going straight into “Find People” mode.
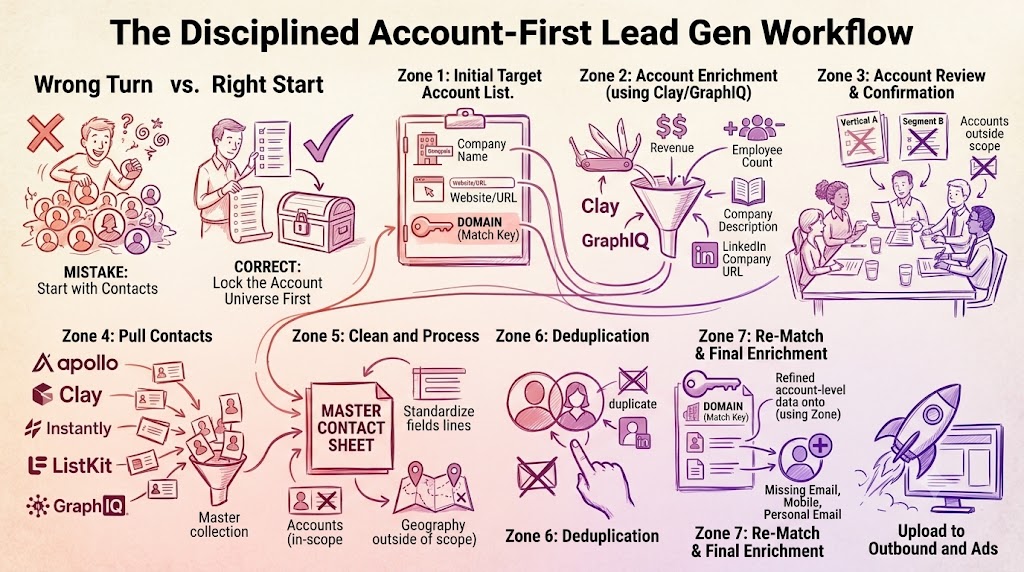
That feels productive, but it creates problems later. If you don’t first lock the account universe, you’ll pull contacts from companies that don’t belong, miss companies that should be included, and burn time deduping a messy file that should never have existed.
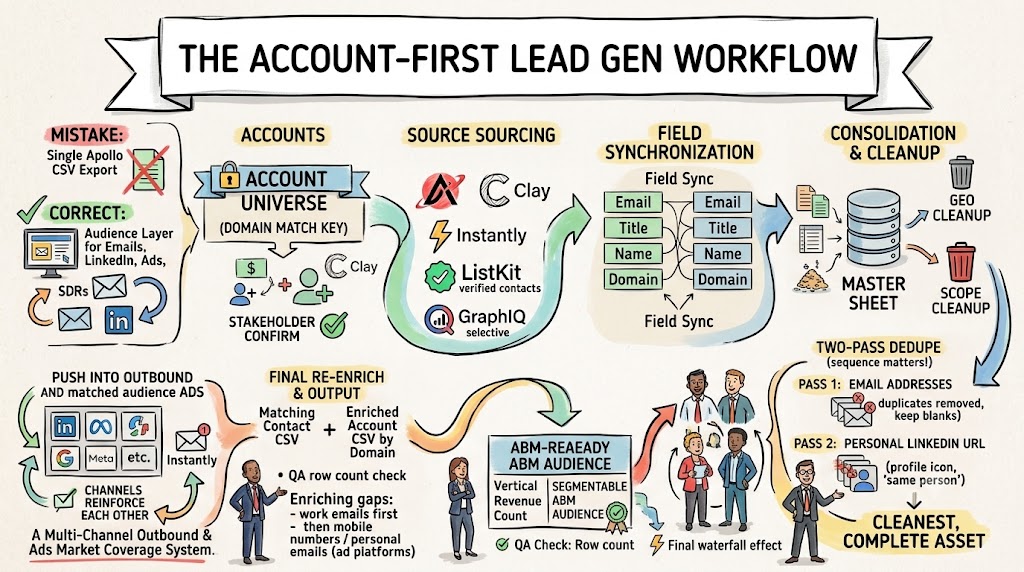
The better order is simple: start with the target accounts. Get the company name and website or domain for every company you care about. The domain becomes the match key across the whole system. You’ll upload that same account list into Apollo, Clay, Instantly, ListKit, and GraphIQ, and later you’ll use it again to match account-level fields back into your final deduped contact list.
Before pulling people, enrich the account list with revenue, employee count, description, and LinkedIn company URL. Clay is the natural tool for this step because it can enrich those fields in bulk. GraphIQ can also help with firmographic context. Once the account list is enriched, the stakeholder or internal team should confirm which accounts are actually in scope. In the original build, there were decisions around verticals and unknown company-size records. In a generalized workflow, the same principle applies: decide what is in or out before you spend credits pulling people.
Ryan’s guidance here is practical because it prevents downstream cleanup: lock the company universe first, then pull contacts.
The workflow looks like this:
- Create the initial target-account list with company names and domains.
- Enrich accounts with revenue, employee count, company description, and LinkedIn company URL.
- Confirm which accounts and segments are in scope.
- Pull contacts from Instantly, Apollo, ListKit, Clay, and selectively GraphIQ.
- Create one master contact sheet per vertical or target market.
- Standardize fields and append all exports into the same sheet.
- Remove contacts outside the target geography.
- Dedupe first by email address, then by personal LinkedIn URL.
- Add account-level fields back into the contact list using domain as the match key.
- Enrich missing work emails, mobile numbers, and personal emails before uploading to outbound and ads audiences.
That is the system. It’s not complicated, but it does require discipline.
Organize everything by vertical or target market
The source workflow separated the build by vertical. That matters because most SaaS companies don’t message every segment the same way. If one audience needs a different email sequence, ad angle, landing page, or value proposition, it deserves its own list.
You can think of each vertical as its own mini-market. It gets its own Apollo tab, Clay tab, Instantly tab, ListKit tab, GraphIQ tab if used, and then a combined final tab. The summary sheet tracks how many contacts came from each source and how many survived the dedupe process.
In the anonymized build, the list size was large enough to show why this structure matters. Apollo contributed roughly 18,439 contacts, Clay contributed roughly 16,815, and ListKit contributed roughly 2,882 contacts for one of the verticals where it was used. At that scale, a messy spreadsheet becomes painful fast. A clean tab structure saves you hours.
Ryan’s line from the video is worth repeating here: “The first step is to select the fields to combine and order them.”
That sounds basic, but it is the difference between a usable master list and a broken one.
Pull contacts from each platform against the same account list
Each tool plays a different role in the build. The mistake is expecting all of them to behave the same way.
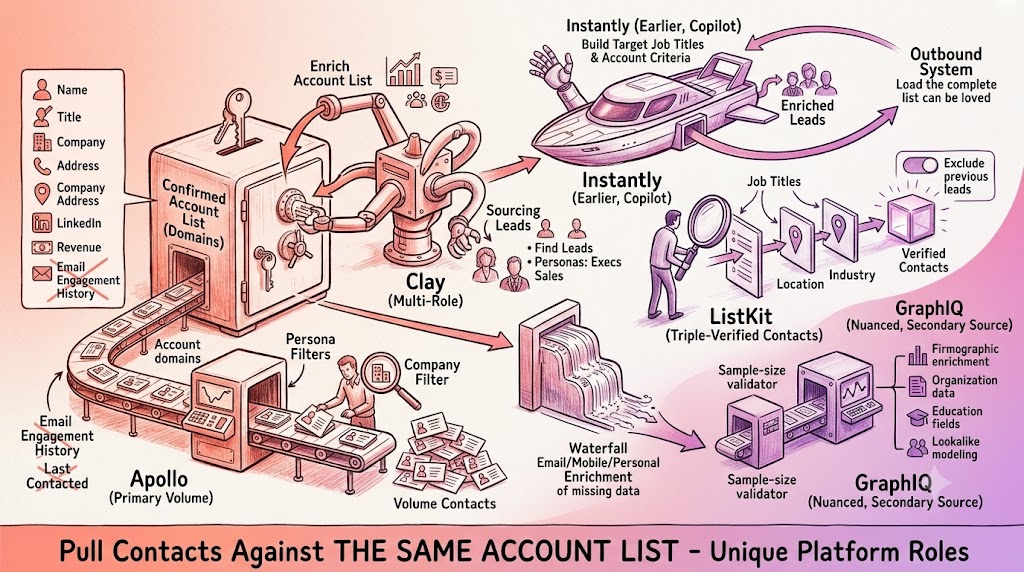
Apollo is the primary volume source. The process is to go into Find People, load the saved search or persona filters, apply the company filter using your confirmed account domains, then apply the right persona, job title, and email status filters. The company filter is important because it forces Apollo to search only inside your ABM account list.
Once you have the right people, configure the export columns before downloading. In the source build, the export included identity fields, job title, industry, employee count, phone fields, person LinkedIn URL, company LinkedIn URL, website, location fields, company address fields, annual revenue, funding fields, SIC codes, and other useful firmographic data. Fields like email engagement history, “do not call,” lists, last contacted, demoed, and other tool-specific fields were turned off because they were not useful in the master ABM list.
Clay does multiple jobs. First, it enriches the account list. Then it can source people through Find Leads, using saved people searches like executives, sales leaders, marketing leaders, senior roles, director roles, and other persona groupings. Later, after the master list is combined and deduped, Clay becomes the waterfall enrichment engine for missing work emails, mobile numbers, and personal emails.
Instantly is used earlier in the contact pull sequence. In the source workflow, Ryan used Instantly Copilot to build a SuperSearch, using the target job titles and account criteria, then triggered enrichment. The example prompt was direct: build the search, enrich the leads, and export them to a CSV. Instantly then becomes both a sourcing tool and the eventual outbound system where the final ABM list can be loaded.
ListKit is a useful source for triple-verified contacts. The process is to use Search → People, filter by job title, location, industry, company size, and target companies or domains, then select whether you want email-only, phone-only, or email-plus-phone contacts. You also set max individuals per company and total export quantity. One key detail from the playbook is to keep the Exclude option checked so you don’t repull leads from previous exports.
GraphIQ is more nuanced. In the source workflow, it was treated as a secondary or optional source because the job-title targeting did not produce the same usable precision and volume as the other tools. That doesn’t mean it has no value. It can still be useful for firmographic enrichment, organization data, education fields, relationship mapping, and lookalike modeling. But for job-title-based ABM contact volume, validate a small sample before making it a core source.
This is how I think about it: Apollo, Clay, Instantly, and ListKit are the main contact engines. GraphIQ is a useful enrichment and secondary data source, but not necessarily the place I’d rely on first for a clean persona pull.
Standardize the fields before you combine anything
The most important part of the video was not the dedupe step. It was the field-matching step before the dedupe.
Ryan said it plainly: “If the fields are in a different order, it’s not going to work.”
This is where most list builds break. You copy Apollo rows into a combined sheet, then paste Clay underneath, but Clay’s “Title” column is where Apollo’s “Email” column was. Suddenly your spreadsheet looks full, but the data is wrong. And because it’s wrong in subtle ways, you might not notice until you’re uploading bad rows into Clay, Instantly, or ad platforms.
Before appending each export, reorder the columns so every source matches the same structure.
The baseline master fields should be:
- First Name, Last Name, Full Name, Work Email, Job Title, Company, Location, Website or Domain, Personal LinkedIn URL
- Mobile Phone, Company Phone, Employee Count, Industry, Company LinkedIn URL, City, State, Country, Company Address
- Account-level fields like vertical, account tier, revenue, employee band, description, and any segmentation fields you’ll want later
The “Full Name” field is more important than it looks. In the video, Ryan explained, “I’m putting the full name here because later when we use Clay to enrich, it uses the full name to get mobile phone numbers.”
That’s the kind of small operational detail that saves you later. You can create Full Name by combining First Name and Last Name with a concatenate formula. If a platform like GraphIQ exports the name as one field, split it into first and last name using the text-to-columns function, then preserve the original full name field.
With GraphIQ specifically, the video showed a few cleanup steps that are useful to remember. If website is missing, you can often derive the domain from the email address by splitting the email at the “@” symbol. If a generic phone field is actually the company phone, rename it properly. If there is a cell phone field, map it into Mobile Phone. The field names don’t need to be identical across every source before you paste, but the data must be in the same order.
After every paste, spot check. Make sure email is under email, job title is under job title, company is under company, website is under website, and personal LinkedIn URL is under personal LinkedIn URL.
This is not glamorous work. But it’s the work that makes the list usable.
Combine the exports into one vertical master sheet
Once the columns match, start appending each platform export into the combined sheet for that vertical or target market.
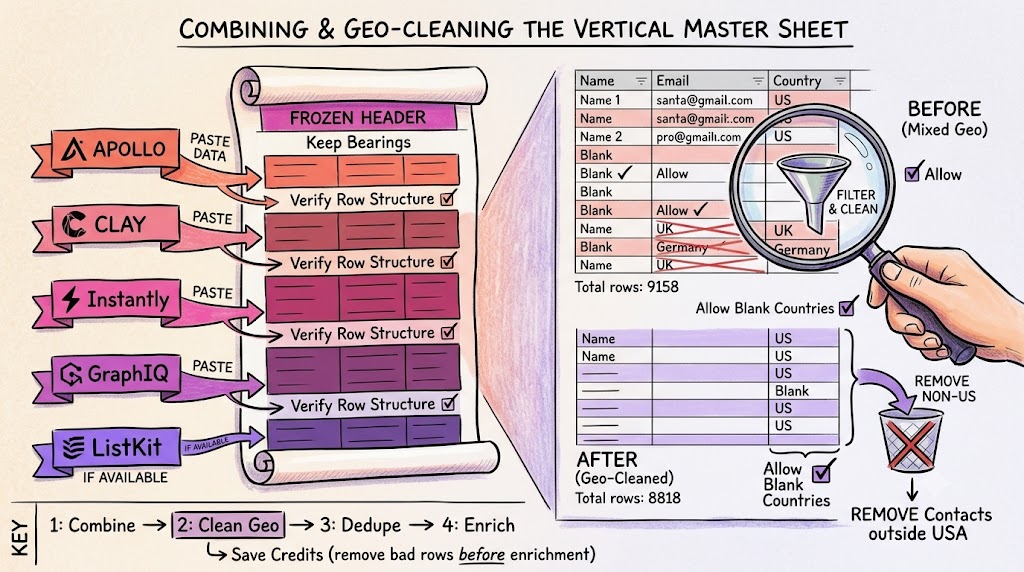
In the video, the process was simple. Start with Apollo. Then bring in Clay. Then Instantly. Then GraphIQ. Add ListKit where available. Freeze the header row so you can keep your bearings. Paste each cleaned export at the bottom of the combined sheet. After each paste, verify that the row structure still matches.
This is also the point where you remove contacts outside your target geography. In the source example, the target geography was the United States, so anything outside that geography was removed. Blank country fields were allowed to stay because they could still be valid records with missing data.
In one anonymized vertical example, the raw combined file had 9,158 people before cleanup. After removing non-target geographies, the file had 8,818 rows. That’s exactly why you don’t want to enrich too early. Every bad-fit row you remove before enrichment saves credits later.
Ryan’s sequencing is really smart here. Combine first. Clean geography second. Dedupe third. Enrich only after that.
Dedupe first by email, then by personal LinkedIn URL
The dedupe order matters.
The first dedupe pass should be by email address. Email is the cleanest unique key when it exists. Export the combined sheet as a CSV and dedupe by email. In the video, Ryan’s instruction was: “Dedupe this CSV file based on email address. If the email address field is blank, keep it.”
That last sentence is important. Don’t delete blank email rows. A row with no email might still have a personal LinkedIn URL, company, title, and enough information to enrich later through Clay. If you throw it away too early, you lose potentially valuable contacts.
In the anonymized example, the first dedupe pass removed 1,079 duplicate emails. That is a meaningful savings before any additional enrichment.
The second dedupe pass should be by personal LinkedIn URL. Ryan explained the logic clearly: “If it’s the same exact LinkedIn URL, then it’s the same exact person.”
This catches the duplicates that email dedupe misses. One source might have a work email. Another might have no email but the same LinkedIn URL. A third might have a different or outdated email. The personal LinkedIn URL ties those records back to the human being.
The key word is personal. Ryan was very specific on this point: “Always dedupe based on personal LinkedIn, not company LinkedIn, because there are multiple people at the same company.”
That is an easy mistake to make. Company LinkedIn URL is an account-level field. Personal LinkedIn URL is a person-level field. Use the person-level field to dedupe people.
After the second dedupe, the anonymized vertical example landed at 3,564 unique people, with 2,570 unique emails and roughly another 1,000 LinkedIn-only records. That’s a much cleaner asset than the original 9,158-row combined file.
Add account data back into the contact list
After deduping, the contact list is clean, but it still needs the company-level context that makes it useful for segmentation.
This is where you bring the account list back in.
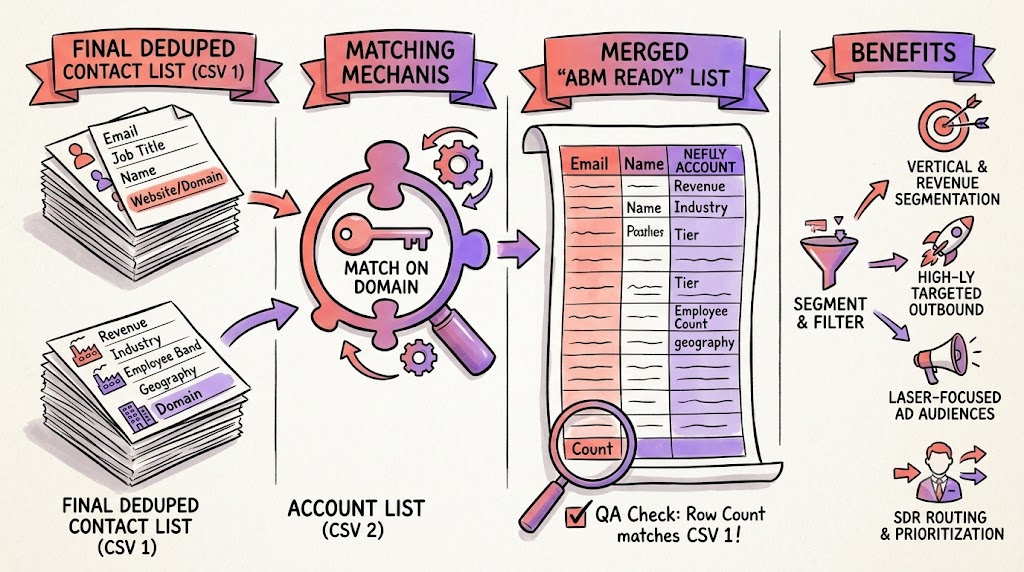
Export the final deduped contact sheet as one CSV. Export the account list as another CSV. Then match the account data into the contact file based on the domain field.
The prompt Ryan used in the video was essentially: add the fields from CSV 1, the account list, to CSV 2, the deduped contact list, based on the domain field. The final output should keep the same number of rows as the deduped contact sheet and include all the useful account fields from the company list. It should also avoid unnecessary duplicate fields, like having two company name fields, two country fields, or two company LinkedIn fields.
This step matters because it turns the final list from “a bunch of people” into a segmentable ABM audience.
Now you can filter by vertical, revenue band, employee band, target segment, account tier, geography, or any other company field you enriched earlier. That makes the list far more useful for outbound sequences, ad audiences, LinkedIn campaigns, and SDR routing.
In the video example, Ryan checked whether the final merged output had the same row count as before. That’s the right QA step. If the row count changes during an account-field merge, something went wrong.
Enrich only after the list is clean
Once the list is combined, cleaned, deduped, and matched back to account fields, then enrichment makes sense.
Clay should be used for missing work emails first. Only isolate rows that are missing a work email and enrich those. Don’t pay to enrich rows that already have a valid email, and definitely don’t pay to enrich duplicate records.
After that, run the final enrichment pass for mobile numbers and personal emails. This is especially useful for ad audience matching and multi-channel follow-up. Personal emails can improve match rates in some ad platforms, and mobile numbers can help with phone-based or additional identity matching workflows where appropriate.
This is the part of the process where sequencing saves real money. If you enrich before dedupe, you pay multiple times for the same person. If you dedupe first, you only enrich the rows that survived.
Push the final list into outbound and matched audience ads
The finished ABM list should not sit in a spreadsheet.
Upload it into Instantly for outbound. Upload it into Meta, LinkedIn, Google, and other ad platforms as matched audiences where applicable. Use it for retargeting, outbound campaigns, LinkedIn follow-up, and warm nurture once people start engaging.
This is why the list matters so much. It becomes the connective tissue between your channels.
A clean ABM list lets your outbound and ads reinforce each other. The same buyer who gets your email can also see your matched audience ads. The same person who clicks can be retargeted. The same engaged contact can be moved into a warm email sequence or LinkedIn follow-up campaign.
That’s the actual ABM motion.
Not a list. A market coverage system.
Final thought
The best ABM lists are built in layers.
You start with the right accounts. You pull contacts from multiple platforms. You standardize the fields before combining anything. You append the sources carefully. You remove bad-fit geographies. You dedupe by email. You dedupe again by personal LinkedIn. You add account fields back by domain. Then, and only then, you enrich the remaining gaps.
That sequence is what turns disconnected exports from Apollo, Clay, Instantly, GraphIQ, and ListKit into one usable ABM asset.
It takes a little patience, but the payoff is huge. You end up with a clean, segmentable, enriched lead list that can power outbound email, matched audience ads, LinkedIn outreach, enrichment workflows, and SDR follow-up.
And in B2B SaaS, that list becomes one of the most valuable growth assets you own.